By Fredrik Brattstig @virtualbrat
6 May 2026
The challenge: I want to replace the IGEL OS default screensaver with a function to display videos and/or still images in a random pattern, or eventually I would like to play videos in sequence of file name – can this be done?
YES! Here is the how!
I’ve heard about customer requests to play videos as a screensaver. And as you know, I like an appealing desktop user interface – I take that challenge!
I built a recipe for IGEL OS 12 App, called videoscreensaver. The foundation of the app is that it contains a python script that when launched checks for system idle timeout. when the selected time out is reached, it will index two folders /userhome/videoscreensaver and /userhome/videoscreensaverpics. then it will fire up a mini webserver that is only listening to 127.0.0.1, serving a random (or by choice filename sequenced) playlist. Then it launches Microsoft EDGE in full screen kiosk mode to play the playlist. I’ve chosen to use Microsoft EDGE as it suites the use case nicely as a media playback software and has the possibilities to play the playlist.
Microsoft EDGE will be installed when you install the videoscreensaver app as it is declared as a dependency in the app recipe.
Why Microsoft EDGE, and not VLC or any other media player?
Good question. And the response is that, when building the script, I extended the use case. I wanted to add a PIN protection to the screensaver. The reason for the PIN protection is from thinking about customer close (but not customer centric) devices, let’s say in a furniture store, where the employees help customer to place orders (Yes, we have a local store of this sort close to where I live) – What if the employee machines, that are in on the shop flor, but not designed to be user by customers, could start playing advertisement while not in use, and you need to know the pin to interact with the system again = the employees of the store? Deal of the day, the current marketing campaign etc. can be displayed as a simple digital signage.
The response to why Microsoft EDGE: When testing media players, like VLC, it wasnt possible to control the PIN dialogue, and making it sure to disable system interaction using a media player, but it was successful with Microsoft EDGE as a player.
I can see many use cases for the video screensaver, not just as an appealing user experience, but as said the simple yet powerful signage.
To use this video screensaver I strongly recommend using IGEL OS 12.8.0 or higher version, as the videoscrensaver is built for the desktop elements that was introduced with IGEL OS 12.8.
To get the app, you need to download the recipe from here:
videoscreensaver-1.0.1-recipe.zip
Now, as you have the recipe as a .zip file, you need to build the app. This is done using the IGEL App creator Portal https://appcreator.igel.com following instructions from IGEL Knowledge Base here: https://kb.igel.com/igel-app-creator/current/igel-app-creator-portal#Creating-Your-App-in-the-IGEL-App-Creator-Portal
Here is a video of the process
Now, when we built the videoscreensaver-1.0.0.ipkg you have instructions in the above Knowledgebase Article on what’s needed and how to install it on your IGEL OS endpoints. Hint: You will need to distribute either the community certificate OR your assigned corporate certificate, based on your licensing level, found in the IGEL App Creator Portal.
When you have installed the app, you need to transfer videos and/or pictures to your IGEL OS endpoint, to prohibit the screensaver from just showing a black screen. the videoscreensaver app will create two writeable and persistent directories /userhome/videoscreensaver (for videos, supported formats: mp4, mkv, avi, mov, wmv, webm, mpg, mpeg) and /userhome/videoscreensaverpics (for still images, supported formats: jpg, jpeg, png, bmp, webp. You can populate these folders using the IGEL UMS, scp, or local file copy.
Would you not want to have a writeable partition, you can easily alter the recipe to use read only folders instead and provide a tar file containing your videos and pictures while building the app with the IGEL App Creator Portal.
When you have the app installed, or added to your UMS, there is a provided configuration utility, which you can alter using a UMS profile, or the local IGEL Setup. Here is how it looks and options explained:
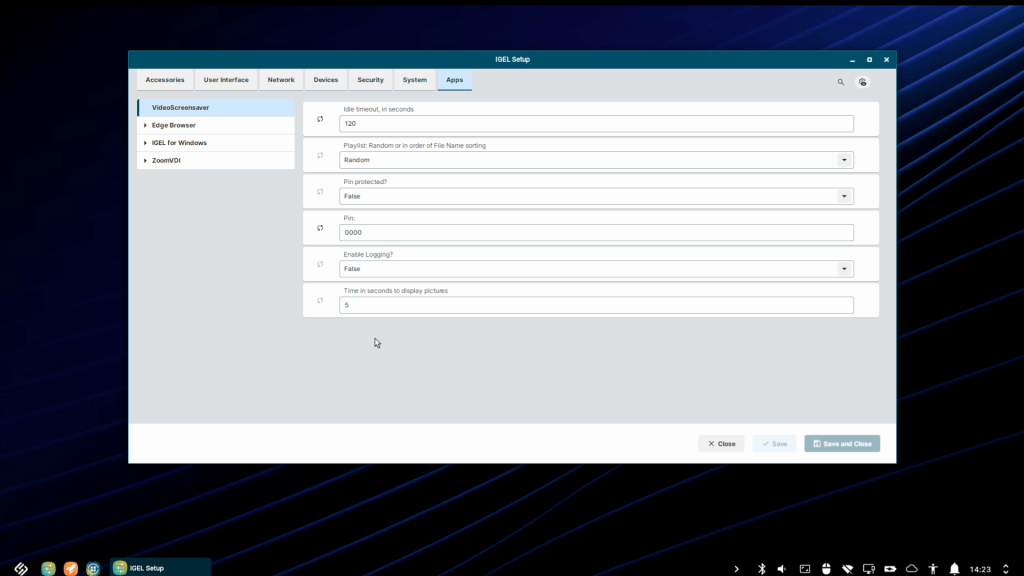
The configuration options is accordingly:
Idle timeout in seconds: (300) controls how long idle time of the system until the screensaver starts
Playlist: random or in order of filename: (Random) Quite obvious, if you want to have a special sequence in order of filename, hint could be to name the files 1_vido.mp4, 2_video.mp4 etc..
Pin protected?: (False) turns on/off PIN protection
PIN: (0000)
Enable logging: If something goes wrong, you can enable logging to the journal
Time in seconds to display pictures: For how long should each picture be shown (videos plays till the end)
With that said, it’s time to show the end result:
Hope you like this app creator portal tutorial and the videoscreensaver app!
/Fred
