

By Fredrik Brattstig @virtualbrat
June 20 -2023
Microsoft has an offer to run Azure workloads on-prem. You can run Azure-provided images on your own hardware and make use of exceptionally low latency for your on-prem connections, and you do not need to traverse the internet to reach your Desktops. This is called Azure Stack HCI (Read about Azure Stack HCI here: https://learn.microsoft.com/en-us/azure-stack/hci/overview)
As an add-on to that, Microsoft is offering a public preview of running Azure Virtual Desktop (AVD) workloads on HCI that, in combination with RDP-Shortpath (Read about RDP-Shortpath here: https://learn.microsoft.com/en-us/azure/virtual-desktop/rdp-shortpath?tabs=managed-networks).
Imagine having multi-Session Windows 10 or Windows 11 running in an on-prem scenario enabling you to give your users the best experience, always, or maybe you are in an organization that does not allow you to put data in the cloud? Then, this is for you!
During the last weeks, I have had the opportunity to setup and configure Azure Stack-HCI for testing due to a case at a customer site. This is quite early, and it was a bit difficult (at least for me) to get an understanding of what I needed and how to get everything in place and functional. One of the reasons for this is, as already mentioned: AVD on Azure Stack-HCI is in public preview. Full documentation is not available etc, at least not with a redline when using a single node cluster. You should not go into production, but hey, why not test it so you know what to expect when the time comes?
I will try to explain to you how to get from 0 to working AVD on Azure Stack-HCI, by setting up a single-node Azure Stack-HCI cluster and learning how to download, convert, and provision AVD workloads on your single on-prem server. I have been using some sources of information, where Microsofts Thomas Maurer’s blog https://www.thomasmaurer.ch/2022/05/set-up-single-node-azure-stack-hci/ was of great help to get the single node cluster set up. Then, with the help of Microsoft learn pages (https://learn.microsoft.com) and some help from Jet Lin (AS-HCI guru) I finally was able to download VM images from Azure and get them added to my AS-HCI cluster and provisioned as AVD hosts in my Azure Tenant.
Let’s start with the hardware – You will need some kind of machine to run your workloads on.
Basically, I built a new PC, kind of high-end, as I do not have the luxury of having spare servers lying around. The PC is an Intel Core i7 (12th Gen), 64 GB RAM, one 256 GB NVMe, and one 2TB NVMe disk. One of the disks is used for the AS-HCI operating system, here I will use the 256GB disk, and one is used as the storage volume for the AS-HCI cluster (This is where the workload VMs and Azure images will be living, can’t have enough disk space here.)
So, now we have the metal box put together and need to install AS-HCI. Head over to https://azure.microsoft.com/en-us/contact/azure-stack-hci/?cdn=disable , register and you will be taken to this page:
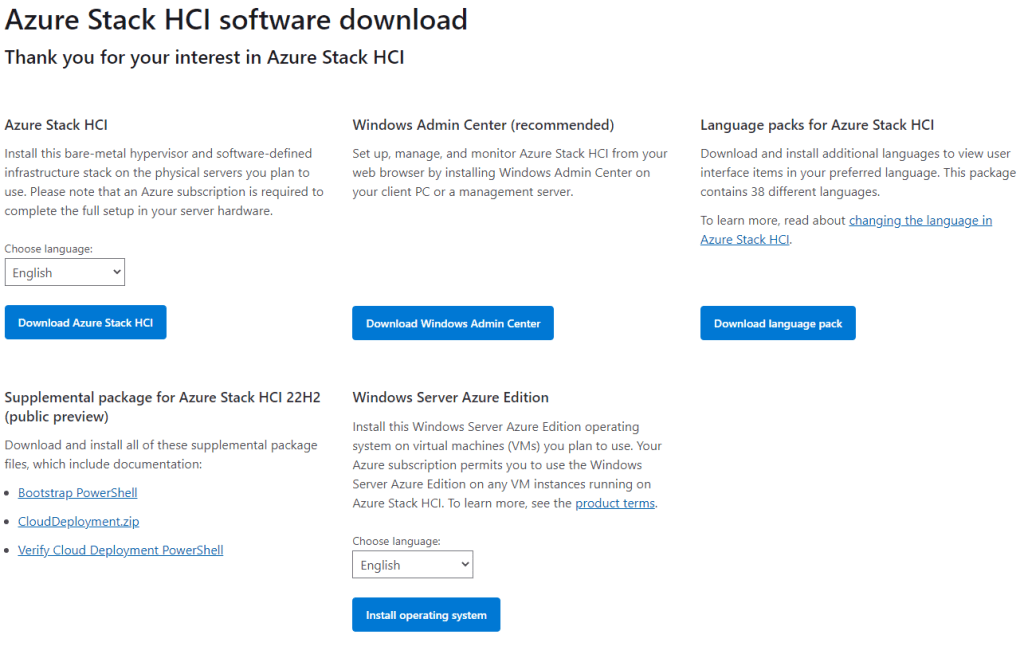
Click on “Download Azure Stack HCI” and wait for the download to finish, also, download “Windows Admin Center (this will be for later use). Burn the .ISO file to a USB stick (I used Rufus https://rufus.ie), then boot your designated hardware box where you are about to install Azure Stack HCI and install it as you would with any Windows Server. When you come to the disk selection, I would start by removing ALL partitions on all disks and then make sure that you select the correct disk for the operating system install, in my case, the 256 GB NMVe disk. A few minutes later, your Azure Stack HCI machine should be installed and needs a reboot! Do IT!
After reboot, you will be prompted to set the local Administrator password; please do so. Then the SConfig tool will load and will look like this:
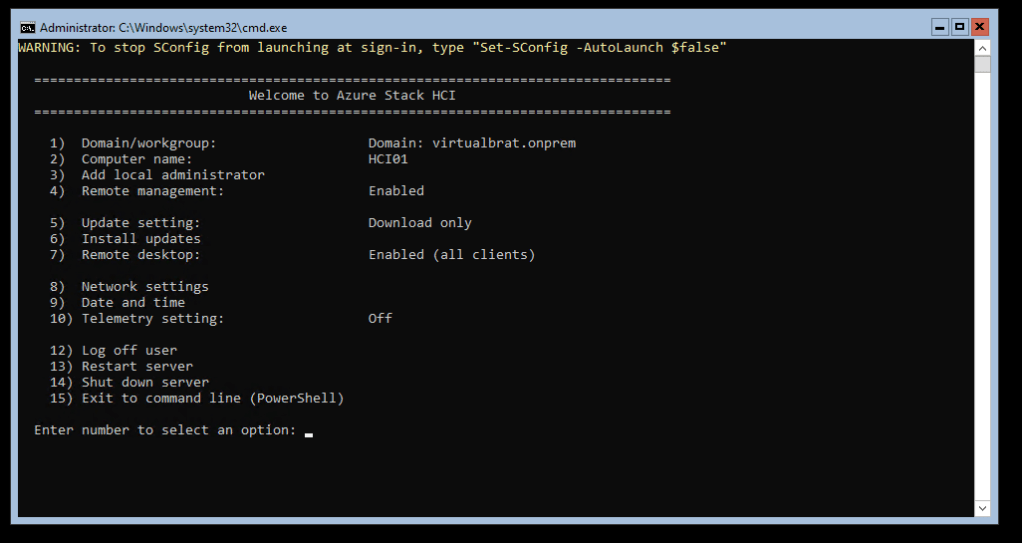
For reference, here is what I have set:
- 1) I have added my host to virtualbrat.onprem
- 2) I have set the Computername to “HCI”
- 7) I have enabled Remote Desktop
- 8)
- IP-Address 172.16.200.60
- Subnet mask 255.255.255.0
- Gateway 172.16.200.254
- Preferred DNS Server 10.0.0.11
Use SConfig to set an IP address, subnet mask, and gateway. Set DNS Server, don’t forget to turn on “Remote Desktop” if you want to remote to the machine, and finally join the Azure Stack HCI host to your domain. Here is the Microsoft article describing SConfig maneuvering
When you are happy with the settings needed in SConfig, and the server has restarted and is ready to go, make sure that you login with domain admin credentials, and in SConfig you should select option 15 (Exit to command line (Powershell)
Now it’s time to do some powershell’ing!
First of all, set your correct keyboard layout; if you are not using an English-US keyboard, I will set mine to a Swedish keyboard layout:
Set-WinUserLanguageList -LanguageList sv-se -ForceThen, we need to start installing the stuff needed; we can do that with one single line of PS code:
Install-WindowsFeature -Name "BitLocker", "Data-Center-Bridging", "Failover-Clustering", "FS-FileServer", "FS-Data-Deduplication", "Hyper-V-PowerShell", "RSAT-AD-Powershell", "RSAT-Clustering-PowerShell", "NetworkATC", "Storage-Replica" -IncludeAllSubFeature -IncludeManagementTools
Now, we will enable ALL features of Hyper-V:
DISM /Online /Enable-Feature /All /FeatureName:Microsoft-Hyper-VAnd finally, when the installation of all features is done, restart the Azure Stack HCI host!
At this stage, we are done with the console of the Azure Stack HCI host, you can disconnect any monitor, keyboard, and mouse and instead connect using Remote Desktop, which is my preference, or you can PowerShell remote to the HCI host.
winget install --id Microsoft.Powershell --source wingetLogin as Domain Admin and exit SConfig to Powershell; now its time to start preparing the cluster storage volume disk (each code box is one input to the Powershell command-line):
Update-StorageProviderCacheGet-StoragePool | ? IsPrimordial -eq $false | Set-StoragePool -IsReadOnly:$false -ErrorAction SilentlyContinueGet-StoragePool | ? IsPrimordial -eq $false | Get-VirtualDisk | Remove-VirtualDisk -Confirm:$false -ErrorAction SilentlyContinueGet-StoragePool | ? IsPrimordial -eq $false | Remove-StoragePool -Confirm:$false -ErrorAction SilentlyContinueGet-PhysicalDisk | Reset-PhysicalDisk -ErrorAction SilentlyContinueGet-Disk | ? Number -ne $null | ? IsBoot -ne $true | ? IsSystem -ne $true | ? PartitionStyle -ne RAW | % {
$_ | Set-Disk -isoffline:$false
$_ | Set-Disk -isreadonly:$false
$_ | Clear-Disk -RemoveData -RemoveOEM -Confirm:$false
$_ | Set-Disk -isreadonly:$true
$_ | Set-Disk -isoffline:$true
}
Get-Disk | Where Number -Ne $Null | Where IsBoot -Ne $True | Where IsSystem -Ne $True | Where PartitionStyle -Eq RAW | Group -NoElement -Property FriendlyNameThe name of your larger disk should now be returned. Perfect, Let’s create an Azure Stack HCI cluster:
New-Cluster -Name "HCICluster01" -Node "HCI" -NOSTORAGE -StaticAddress 172.16.200.61The Azure Stack HCI cluster will now be created with the cluster name “HCICluster01” for the node “HCI”, and the cluster will have the IP-Address 172.16.200.61
When the cluster is created, it’s time to create the storage area for the cluster:
Enable-ClusterStorageSpacesDirect -CacheState DisabledNew-Volume -FriendlyName "Volume1" -Size 1.8TB -ProvisioningType Thin -PhysicalDiskRedundancy 0After those two commands, you should now have created a 1.8TB disk named Volume1 for your cluster. You should be able to browse \\hci01.virtualbrat.local\clusterstorage$ and see “Volume1”
Now, let’s install some Powershell modules needed to continue:
Install-Module -Name Az.StackHCI
Import-Module -Name Az.StackHCI
Install-Module Az.Resources
Import-Module Az.Resources
During the installation of the powershell modules, you will be prompted to allow installation; choose Y or A when prompted.
Now it is time to register your Azure Stack HCI cluster to your Azure tenant. You will need your Subscription ID, Tenant ID and choose a name for your Azure Tenant resource group. (a resource group in your tenant will be created if it doesn’t already exist):
Register-AzStackHCI -SubscriptionId "3b9cada7-1e56-7940-99f8-83adfc7515ad" -ResourceGroupName "HCICluster-RG" -TenantId "7c129784-8aba-d444-ed3a-e04ef18a688c" -region "westeurope" (Don’t worry, the Subscription ID and Tenant ID are scrambled 🙂 )
It will take a while to register the cluster to your Azure Tenant. You will be prompted to login. As the Azure Stack HCI doesn’t have a web browser. You can do this from any machine with a browser, open https://microsoft.com/devicelogin enter the code “D7CJEBK2C” in my example, and authenticate with an Azure Admin account.

Now, grab yourself a coffee and wait for the cluster to be registered.
When done, you should now see the HCI host and the cluster in “Azure Portal – All resources” and in the on-prem AD in both Active Directory Users and Computers, and DNS Records should have been created for the HCI host and the cluster. Congratulations! And continue…
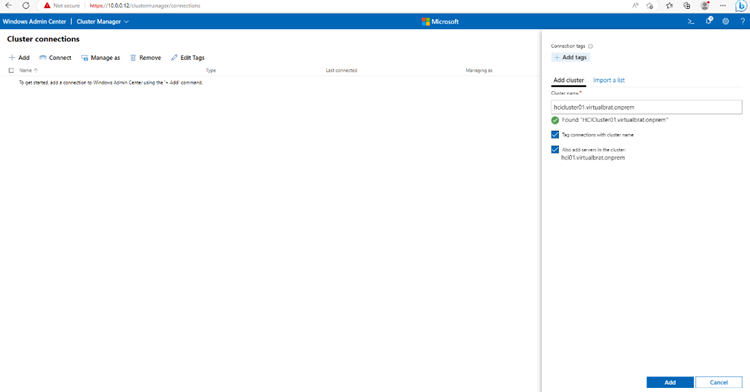
Now it is time to use the Windows Admin Center .msi file you downloaded in the initial part of the blog. Copy it over to the Azure Stack HCI host (This is where I selected to install Windows Amdin Center) and run from Powershell:
2- msiexec /i d:\windowsadmincenter2211.msi /qn /L*v log.txt SME_PORT=443 SSL_CERTIFICATE_OPTION=generateThis will install Windows Admin Center quietly, assign port 443 for the communication and create a self-signed certificate. As this all is just a lab, that is fine! Remember that the cert is only valid for like 90 days.. Read here about it: https://github.com/MicrosoftDocs/windowsserverdocs/blob/main/WindowsServerDocs/manage/windows-admin-center/deploy/install.md
When the installation is done, you can open a web browser and connect to eg, https://172.16.200.60 – Windows Admin Center will ask you to login; I’m using my on-prem domain admin account..
Click on the topmost menu to the right, select Cluster Manager, and add a cluster; type the cluster FQDN – in my case hcicluster01.virtualbrat.onprem – specify credentials if needed..
Now, when you have the cluster added, we need to add a virtual switch to Hyper-V. Navigate to “Networking -> Virtual Switches” in the left pane menu, create one by clicking Add, give it a name (eg External), set the switch type to External, and select the network adapter to tie to the Virtual Switch.
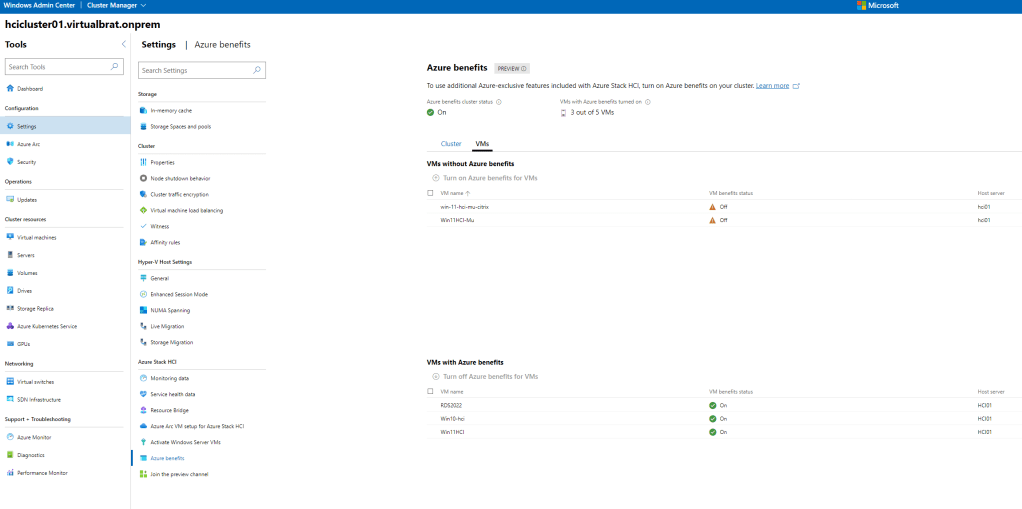
The final piece of configuring the Azure Stack HCI Cluster is to enable Azure benefits – this is the magic of being able to run Multi Session Windows 10 and Windows 11 VMs on-prem! Let’s get it done! Navigate to “Cluster Manager” in Windows Admin Center, and your cluster, click on settings in the left menu pane, scroll down to “Azure Benefits” and enable for your cluster. It should look something like this when done:
Cool! You do now have an Azure Stack HCI Cluster, that is ready to rock and roll!
Ok, and now what?
We need to grab an image from Microsoft Azure and convert it to a usable format for your Azure Stack HCI Cluster.
From a management server (I used a regular windows box, due to that I was not able to get Az installed on my Azure Stack HCI host), start PowerShell, and make sure that you have Az tools installed (https://learn.microsoft.com/en-us/powershell/azure/install-azps-windows?view=azps-10.0.0&tabs=powershell&pivots=windows-psgallery)
And also, make sure that you have azcopy (https://learn.microsoft.com/en-us/azure/storage/common/storage-use-azcopy-v10). In the example a few lines below, I have azcopy in c:\temp..
Az loginAnd login as an Azure AD domain admin
OBS! If you have multiple subscriptions, make sure that you set the correct one (where your Resource group exists, which you will use to get the image from Azure to your HCI cluster) eg:
Az account set --subscription "3b9cada7-1e56-7940-99f8-83adfc7515ad"Now, let’s list the available images in the Azure image repositories:
For Windows 11:
az vm image list --all --publisher "MicrosoftWindowsDesktop" --offer "windows-11" --output tableFor Windows 10:
az vm image list --all --publisher "MicrosoftWindowsDesktop" --offer "windows-10" --output tableYou will now get a list of images available:
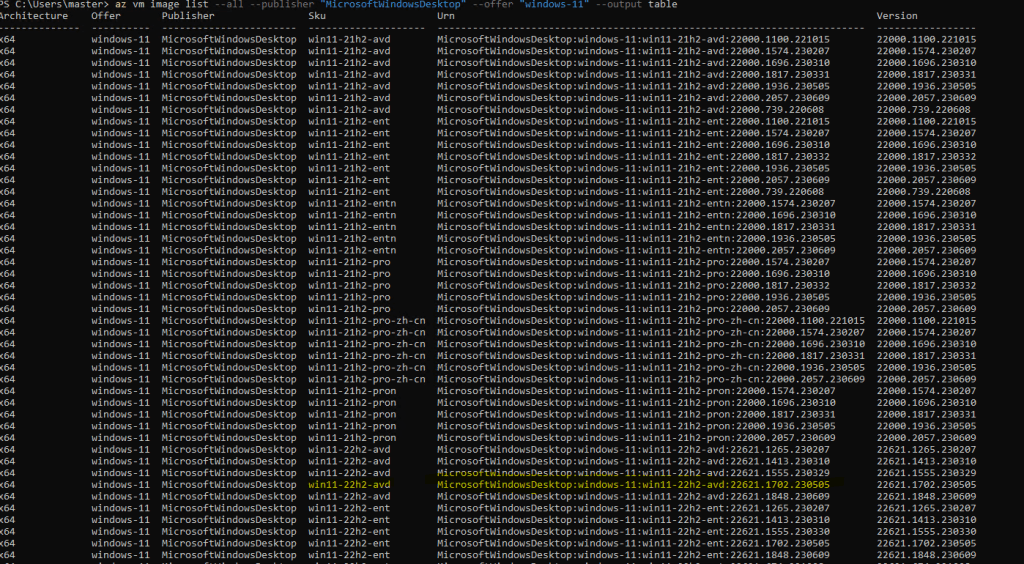
So, let’s prepare the image for downloading ref: https://learn.microsoft.com/en-us/azure/databox-online/azure-stack-edge-gpu-create-virtual-machine-marketplace-image:
$urn=" MicrosoftWindowsDesktop:windows-11:win11-22h2-avd:22621.1702.230505"
$diskName="win11-avd-mu"
$diskRG="HCICluster-RG"
az disk create -g $diskRG -n $diskName --image-reference $urn
$sas = az disk grant-access --duration-in-seconds 36000 --access-level Read --name $diskName --resource-group $diskRG$diskAccessSAS = ($sas | ConvertFrom-Json)[0].accessSasNow, let’s download the image! We will download it to the folder “osimages” in the cluster storage :
C:\temp\azcopy copy $diskAccessSAS "\\hcicluster01.virtualbrat.onprem\clusterstorage$\volume1\osimages\win11-hci-ms.vhd" --check-md5 NoCheckThis can take some good amount of time! Time for another coffee!
When the download is complete, run the following command to revoke access to the image file
Revoke-AzDiskAccess -ResourceGroupName "$diskRG" -DiskName "$diskName"It’s time to convert the transfered.VHD image to a .VHDX format for Hyper-V to be able to adopt it. Only VM gen 2 can be used for Azure Stack HCI. On the Azure Stack HCI host, run the following command to convert the image:
Convert-VHD -Path " \\hcicluster01.virtualbrat.onprem\clusterstorage$\volume1\osimages\win11-hci-ms.vhd " -DestinationPath "\\hcicluster01.virtualbrat.onprem\clusterstorage$\volume1\osimages\win11-hci-ms.vhdx" -VHDType DynamicWhen the converting is done, return to Windows Admin Center, navigate to “Cluster Manager” and open your cluster. Select “Virtual Machines” in the left menu pane and click Add->New
Specify the characteristics of your new VM eg, give it a name, choose the amount of Virtual Processors and amount of memory, and make sure that the Virtual Switch is selected to “External”, At path click Browse and navigate to C:\ClusterStorage\Volume1, click “New Folder” and name it “VMs” open VM’s and click “New Folder” and name the new folder with your VM name. e.g. “Win-11-avd-ms”. Select the folder you just created and click “OK”, then click “Create”
Now its time to copy the image you previously converted:
Copy C:\clusterstorage\volume1\osimages\win11-hci-ms.vhdx C:\\clusterstorage\volume1\VMs\win-11-avd-ms.vhdx"When the copy is done, return to Windows Amdin Center, open the MV you just created, click “Settings” go to “Disks” and click “Add Disk”, select “Use an existing virtual hard disk or ISO image file” and browse to the vhdx you just copied, e.g. c:\clusterstorage\volume1\VMs\win-11-avd-ms.vhdx
That should be it! You should now be able to power on your first VM in your Azure Stack HCI cluster! When you do so, you can go back to the VM overview by clicking “Virtual Machines” in the left menu pane, select your newly created VM, Click “Power->Start” and then click “Connect->Connect”, and you should be presented with this, eg the OOBE wizard:
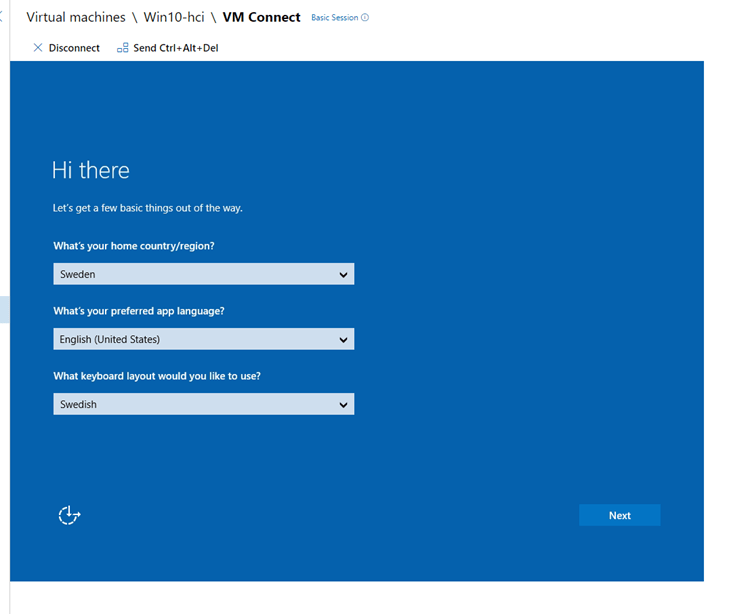
Walk through the Wizard, log in as the local administrator, and join the machine to your on-prem Active Directory. Reboot, and then log in as domain admin to the VM.
Now we need the AVD agents, which can be downloaded from here:
https://learn.microsoft.com/en-us/azure/virtual-desktop/add-session-hosts-host-pool?tabs=portal%2Cgui#register-session-hosts-to-a-host-pool
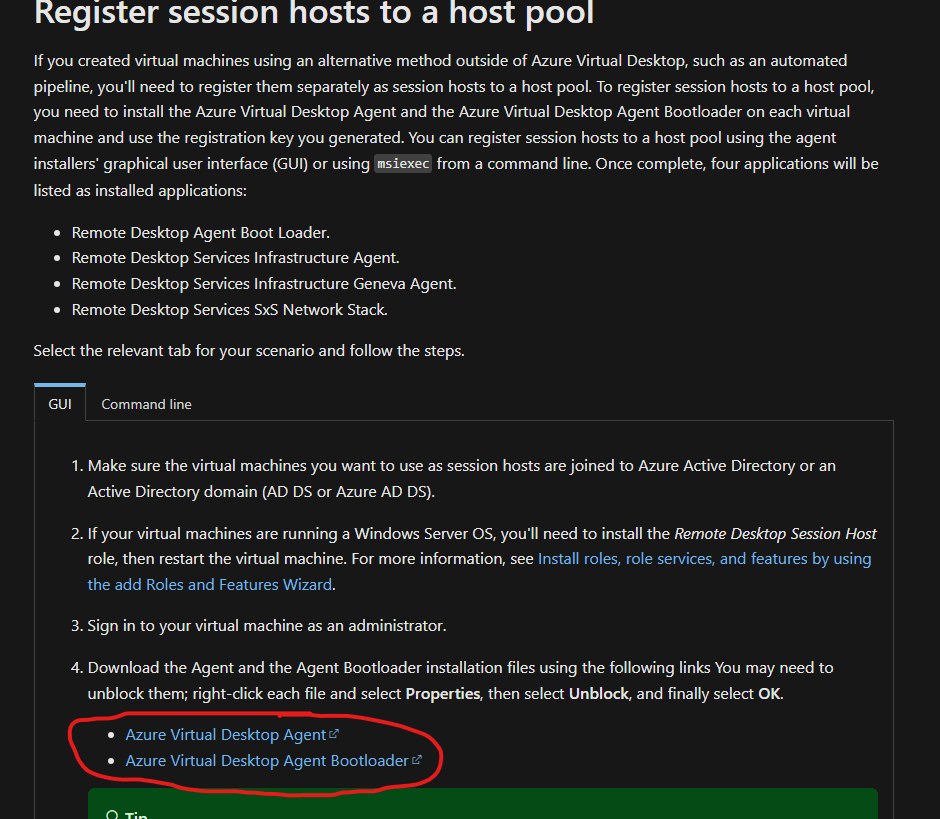
When the two files are downloaded to your VM, let’s create the host pool for your Azure Stack HCI VMs so that they can serve as AVD workloads. Open https://portal.azure.com and navigate to “Azure Virtual Desktop” then create a new host pool. Walk through the “Create a new host-pool wizard”, but do not create any VMs. When the host pool is created, open it, select “Registration Key”, create a new key, and then click “Download” – transfer the downloaded file (or copy its content) to the newly created VM.

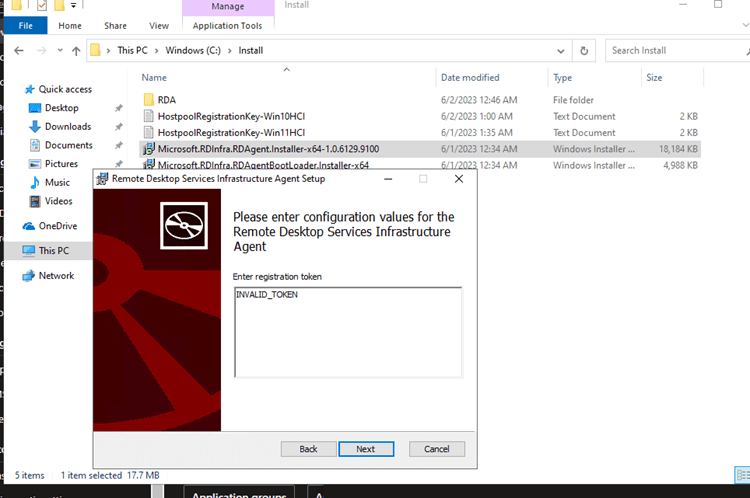
Move back to the remote session of the VM again; install the “Microsoft”RDInfra.RDAgentBootLoader.Installer-x64.msi -> next -> next -> Finish
Then install the Microsoft.RDInfra.RDAgent.Installer-x64-VERSION.msi; when you get to the following screen, insert your token content in the text box replacing “INVALID_TOKEN”:
With some luck, your VM should now show up as a host in your host pool!

Finish the configuration by altering the assignments to allow access for your selected users and groups.
You will need to enable RDP ShortPath for the IGEL AVD session, which can be done by following this guide: https://virtualbrat.com/2023/03/10/rdp-shortpath-greatly-enhances-user-experience-in-azure-virtual-desktop-avd-using-igel-os/
For IGEL OS 12, you enable RDP Shortpath By opening IGEL Setup (or a profile) and add to CMD_EXT:
System->Registry->App->AVD->YourAVDSession->Options->CMD_EXT ,and add, --enable-udpshortpath Also, make sure that the IGEL OS endpoints can resolve the FQDN names of the AVD VMs and has direct line-of-sight to the VMs!
Then use your IGEL OS AVD client to connect to the AVD session!
I did some altering to the maximum frames per second to the AVD host, with IGEL OS AVD client connected to a VM in my Azure Stack HCI cluster; even without a GPU, these are the values reported by Remote Display Analyzer; it’s pretty impressive I would say:

We see a framerate of up to 92 FPS, and the roundtrip latency is really low while in session, generally 0-4ms RTT. That’s how AVD should be!
With this guide, you should now have a fully functional Azure Stack HCI single-node cluster, you should have a Windows 11 VM serving Multi Session enabled to accept Azure Virtual Desktop sessions – allowing for on-prem access to your IGEL OS endpoints, and will be able to test this new technology. I’m looking forward to GA release of Azure Virtual Desktop on Azure Stack HCI!
While waiting for that, I will have a few more follow-up blogs to this one. Stay tuned!
/Fred
