
by Fredrik Brattstig @virtualbrat
Following up on my previous post on Azure Stack HCI and Azure Virtual Desktop and setting up a single node Azure Stack HCI cluster for testing purposes (You can read the blog here: https://virtualbrat.com/2023/06/20/want-to-test-azure-virtual-desktop-on-prem-heres-a-guide-taking-you-from-0-to-a-functional-single-node-azure-stack-hci-cluster-and-azure-gallery-images-installed-and-added-to-your-avd-environment/ ), I have now added an NVIDIA A16 GPU to my Azure Stack HCI host. Installation of the GPU was easy in Azure Stack HCI; here is what I did:
1. Physically install the GPU

I have removed the cover of the GPU, and added a series of mounted fans blowing air to the GPU; and have custom made
3D-printed supports for the GPU and fans keep them aligned.
2. Download the NVIDIA for Azure Stack HCI drivers from the NVIDIA enterprise portal; I’m using 15.2 version of driver. This archive also contains a Grid vGPU User Guide that will give you a good overview of supported GPUs on Azure Stack HCI.
3. Extract the download and transfer the extracted files to the Azure Stack HCI cluster storage
4. Run Powershell on your Azure Stack HCI; navigate to the \Host_Drivers\Azure_Stack_HCI\Display.Driver\ folder
5. Install the drivers using this command:
pnputil /add-driver nvgridswhci.inf /subdirs /install /reboot6. Reboot your Azure Stack HCI server
After reboot and successful installation of your NVIDIA drivers, now it is time to partition the GPU and assign it to your VMs. Open up Windows Admin Center, and install the GPU extension following this Microsoft Learn guide; you will browse for the GPU Extension and get it installed.
Then, open your cluster in Windows Admin Center and select CPUs in the left menu,
you should now see your GPUs listed:

Click on GPU Partitions and then Configure Partition Count and you should end up in a screen like this:

Select your GPU and then the number of partitions you want to create.
As you can see, I’m using an NVIDIA A16 GPU, which actually contains four GPUs in one GPU board. With the A16, I can partition each of the GPUs differently, you see that the first instance has ONE partition, the second instance has FOUR partitions, and I’m currently configuring the fourth instance. Each instance has 16 GB Frame Buffer (totaling 4 GPUs and 64 GB Frame Buffer on this board). When I partition the GPU, I basically partition the GPU for assignment to VMs. The partitioning allows me to assign one physical GPU to multiple VMs.
The choice, as you see in the drop-down menu, gives me a choice of 16/8/4/2/1. If I select 16, each partition will have 1GB Frame Buffer. If I select 8, each partition will have 2GB Frame Buffer, and so on. As you can see, my first instance has only one partition; equal to that, my VM will have 16GB Frame Buffer. The limitation is that I can only assign this vGPU to a single VM. Good for high-performance graphics!
The second instance is split in four, meaning that i can share this GPU to four VMs, giving them some extra graphics kick.
When you have created your GPU partitions, you assign the partitions to your VMs using Assign partition.
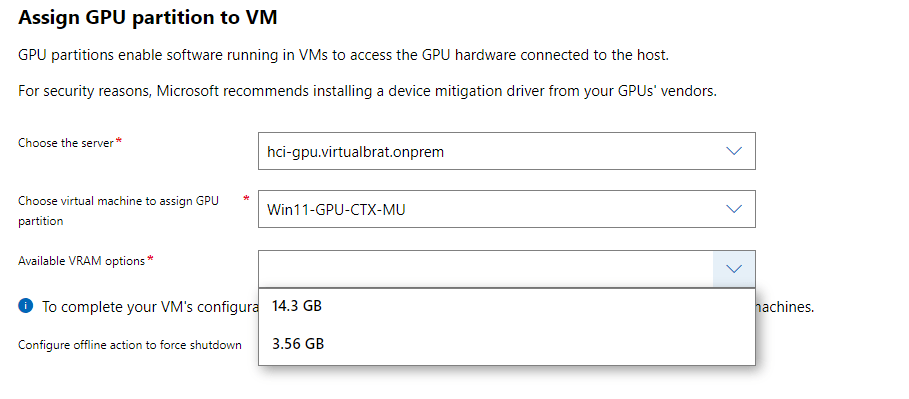
Note that your VM needs to be shut down for the assignment. When the assignment is done, and you start your VM again, log in to the VM as an administrator, and install the drivers found in the Guest_Drivers folder from the downloaded package from Nvidia. That’s it!
Now, from the IGEL perspective. There have been lots of improvements to the IGEL AVD client that is still in the testing phase but is about to be released soon. The upcoming release will enhance the overall user experience (and increase the framerate) of your users’ Azure Virtual Desktop and Windows 365 sessions. IGEL is currently working on hardware acceleration of the graphics stream in AVD/W365 sessions for the IGEL AVD client, and that should be available shortly. But anyway, the current version of the AVD client performs pretty well. In the video below, you will see a Lenovo M70q Celeron-based endpoint running IGEL OS 12 connecting to an AVD host running on my Azure Stack HCI that is powered by an NVIDIA A16 GPU. I’m looking forward to testing the same thing with hardware acceleration using encode/decode to speed things up even more.
While we are waiting for hardware acceleration, I’d say it’s pretty impressive to run the BIM application looking and rotating around the house and then even be able to play Quake II RTX in an AVD session. Quake II RTX is a remake of the old first-person shooter game that was enhanced by NVIDIA’s RTX RealTime RayTracing engine.
Enough writing; let’s look at the video!
That’s it for today folks, see you soon again!
“Why video games in enterprise products?” you might ask – it’s becouse it sets a nice standard for proving performance.
/Fred
